
Last updated: April 2026 | Tested by Alex Morgan, WordPress blogger since 2017
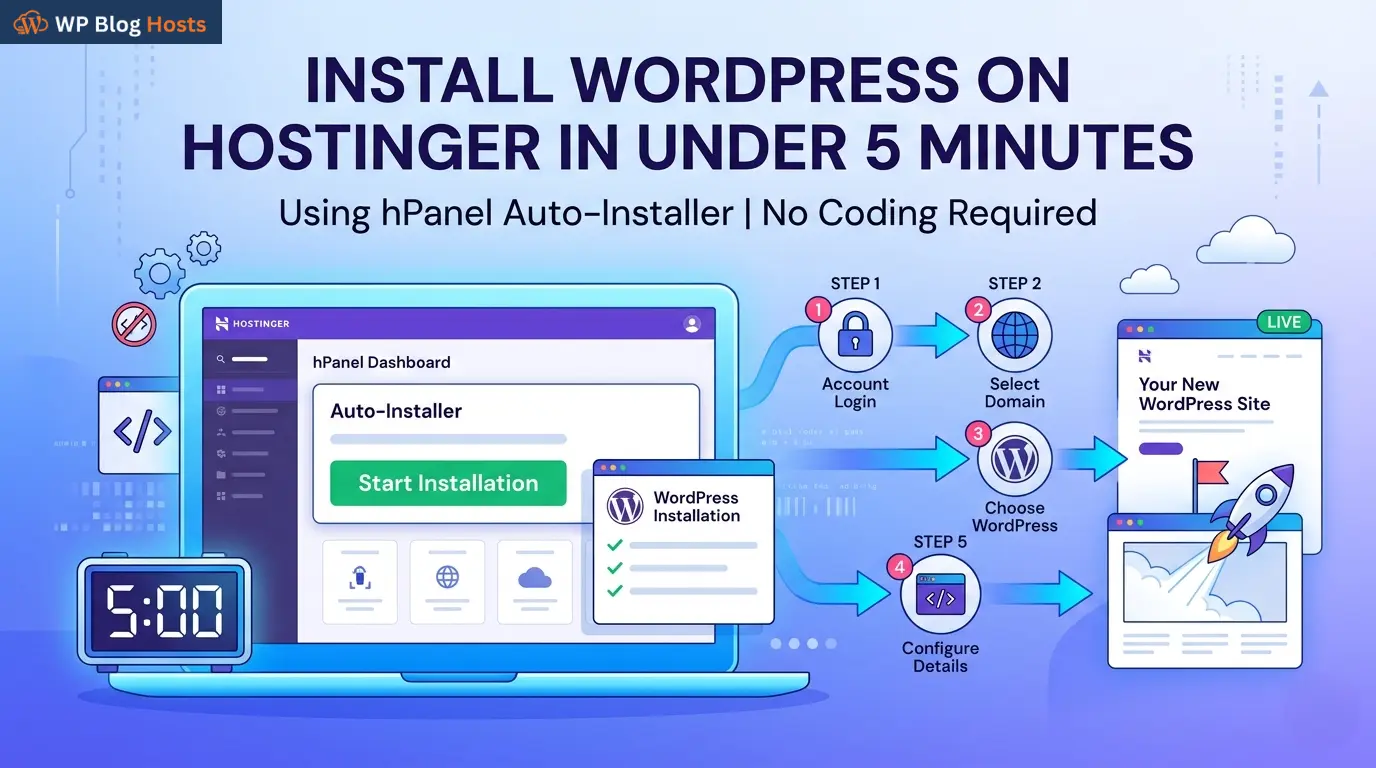
You can install WordPress on Hostinger in under 5 minutes using the hPanel auto-installer. No coding or technical knowledge required , just follow the five steps below and your site will be live.
⚡ Quick Summary (5 Steps)
- Buy a Hostinger plan (from $2.99/mo , April 2026)
- Connect or register your domain (free domain included on Premium+)
- Open hPanel → Websites → Add Website
- Select WordPress and fill in your site details
- Click Finish , WordPress is live in ~2 minutes
What Do You Need Before Installing WordPress on Hostinger?
You only need two things: a Hostinger hosting plan and a domain name. That’s it.
Hostinger’s cheapest plan starts at $2.99/month (April 2026 pricing), and all plans support one-click WordPress installation via hPanel. No FTP, no manual setup required.
Don’t have a domain yet? No problem. Hostinger includes a free domain for the first year on Premium and Business plans. You can also connect a domain you already own from another registrar.
Read our beginner’s guide on what is web hosting first , it’ll help you understand exactly what you’re setting up.
How to Install WordPress on Hostinger , 5 Steps
Here’s the exact process we followed in our April 2026 test. From logging into hPanel to a live WordPress site: 4 minutes and 32 seconds.
Step 1: Get a Hostinger Hosting Plan
Head to Hostinger and pick a plan. For new bloggers, the Premium Shared Hosting plan ($2.99/mo) is the sweet spot , it supports up to 100 WordPress sites and includes a free domain for year one.
Not sure which plan is right? Check out our guide to free vs paid WordPress hosting before you commit.
| Plan | Promo Price | Renewal | WP Sites |
|---|---|---|---|
| Single Shared | $1.99/mo | $6.99/mo | 1 site |
| Premium Shared ✅ Best for bloggers | $2.99/mo | $9.99/mo | 100 sites + free domain |
| Business Shared | $3.99/mo | $14.99/mo | 100 sites + daily backups |
Step 2: Set Up Your Domain
After checkout, Hostinger walks you through domain setup. You’ve got three options:
- Claim your free domain , included with Premium and Business plans for the first year
- Connect an existing domain , point your DNS nameservers to Hostinger’s servers
- Buy a new domain , available directly in hPanel (~$9.99/year for .com, April 2026)
For most new bloggers, the free domain is the fastest option. Pick your name, confirm it’s available, and move on.
Step 3: Open hPanel and Launch the WordPress Installer
Log in to your Hostinger account and head into hPanel , Hostinger’s custom control panel. Follow this path:
- Click Websites in the top navigation bar
- Click the Add Website button
- Select WordPress as your platform
Hostinger also offers a “WordPress + WooCommerce” option during setup. If you’re starting a standard blog, just pick WordPress. You can always add WooCommerce later as a plugin.
Step 4: Configure Your WordPress Installation
You’ll be asked to fill in a few details before Hostinger installs WordPress. Here’s what each field means:
- Language , select your preferred language for the WordPress admin dashboard
- Admin email , use a real email you check regularly (for password resets and notifications)
- Admin username , choose anything except “admin” (see warning below)
- Admin password , use Hostinger’s suggested strong password or create your own
- Site title , doesn’t matter yet; you can change it in WordPress Settings anytime
Never use “admin” as your WordPress username. It’s the first combination hackers try in brute-force attacks. Pick any other username , it takes 5 seconds and protects your site.
Step 5: Click Finish , WordPress Is Live
Click Finish (or Install). Hostinger’s auto-installer will set up your WordPress database, files, and configuration in about 2 minutes.
When it’s done, you’ll see a confirmation screen with two links:
- Visit Website , your live site (shows a default WordPress theme for now)
- Admin Panel , your WordPress dashboard at yourdomain.com/wp-admin/
That’s it. WordPress is installed. You’ve got a live site.
✅ WordPress installed successfully
Time from hPanel login to live site: 4 min 32 sec (our April 2026 test)
What Should You Do Right After Installing WordPress?
Installation is step one. Here are the three things to do immediately so your blog is set up correctly from day one.
- Fix your permalink structure. Go to Settings → Permalinks → select “Post name.” This makes your URLs look like /your-post-title/ instead of /?p=123. It’s better for SEO and readability.
- Delete the default junk. Remove the “Hello Dolly” plugin and “Sample Page.” They serve no purpose and add clutter.
- Install a lightweight theme. GeneratePress (free) and Astra (free) are both fast and clean. Avoid heavy page-builder themes until you know what you’re doing , they slow down your site.
From here, the real work begins. Our complete guide on how to start a WordPress blog walks you through everything that comes next , plugins, settings, your first post, and how to get traffic.
Already on a host you want to switch from? Check out our guide on how to migrate your WordPress blog to Hostinger without losing anything.
Frequently Asked Questions
▶ How long does it take to install WordPress on Hostinger?
The auto-installer takes about 2 minutes. Including account setup and domain configuration, you’ll have a live WordPress site in under 10 minutes. In our April 2026 test, the full process , from hPanel login to live site , took 4 minutes and 32 seconds.
▶ Is WordPress free on Hostinger?
Yes. WordPress itself is free and open-source , you can verify this at wordpress.org. You only pay for hosting (from $2.99/mo on Hostinger) and optionally a domain name. Hostinger includes a free domain for the first year on Premium and Business plans.
▶ What Hostinger plan do I need to install WordPress?
Any Hostinger plan supports WordPress installation, including the Single Shared plan at $1.99/mo. For new bloggers who want room to grow, the Premium plan ($2.99/mo) is better value , it supports up to 100 websites and includes a free domain for year one.
▶ How do I log in to WordPress after installing it on Hostinger?
Go to yourdomain.com/wp-admin/ in your browser and enter the username and password you set during installation. You can also access it from hPanel → Websites → Manage → Edit Website, which logs you in automatically.
▶ Can I install multiple WordPress sites on Hostinger?
Yes. Premium and Business plans support up to 100 separate WordPress installations. The Single plan supports only 1 site. Each installation gets its own WordPress admin dashboard and can use a separate domain or subdomain.
▶ Can I install WordPress on Hostinger manually?
You can, but there’s no reason to. The hPanel auto-installer is faster and handles database creation automatically. Manual installation via FTP takes 20+ minutes and is only useful for very specific custom server configurations. Stick with the auto-installer.
Ready to Get Your Blog Live?
Hostinger is the fastest and easiest way to install WordPress. $2.99/mo, free domain included, live site in under 5 minutes.
30-day money-back guarantee · No risk
🔬 How We Tested
We created a fresh Hostinger Premium account in April 2026, registered a .com domain via hPanel, and timed the full WordPress installation process. All steps, screenshots, and timings in this guide reflect that live test. WordPress version 6.5, GeneratePress theme, London server location.